


In the second article of the series, we guide you on how to run a simple project in an AWS environment using Metaflow. So, let’s get started.
Need an introduction to Metaflow? Here is our article covering basic facts and features.
Prerequisites
- Python 3
- Miniconda
- Active AWS subscription
Installation
To install Metaflow, just run in the terminal:
conda config --add channels conda-forge
conda install -c conda-forge metaflow
and that’s basically it. Alternatively, if you want to only use Python without conda type:
pip install metaflow
Set the following environmental variables related to your AWS account:
- AWS_ACCESS_KEY_ID
- AWS_SECRET_ACCESS_KEY
- AWS_DEFAULT_REGION
AWS Server-Side Configuration
The separate documentation called “Administrator’s Guide to Metaflow“ explains in detail how to configure all the AWS resources needed to enable cloud scaling in Metaflow. The easier way is to use the CloudFormation template that deploys all the necessary infrastructure. The template can be found here. If for some reason, you can’t or don’t want to use the CloudFormation template, the documentation also provides detailed instructions on how to deploy necessary resources manually. It can be a difficult task for anyone who’s not familiar with AWS services so ask your administrator for help if you can. If not, then using the CloudFormation template is a much better option and in practice is not so scary.
AWS Client-Side Configuration
The framework needs to be informed about the surrounding AWS services. Doing it is quite simple just run:
metaflow configure aws
in terminal. You will be prompted for various resource parameters like S3, Batch Job Queue, etc. This command explains in short what’s going on, which is really nice. All parameters will be stored under the ~/.metaflowconfig directory as a json file so you can modify it manually also. If you don’t know what should be the correct input for prompted variables, in the AWS console, go to CloudFormation -> Stacks -> YourStackName -> Output and check all required values there. The output of the stack formation will be available after the creation of your stack from the template as explained above. After that, we are ready to use Metaflow in the cloud!
Hello Metaflow
Let’s write very simple Python code to see what boilerplate we need to create a minimal working example.
hello_metaflow.py

from metaflow import FlowSpec, step


class SimpleFlow(FlowSpec):

    @step

    def start(self):

        print('Lets start the flow!')

        self.message="start message"

        print(self.message)

        self.next(self.modify_message)


    @step

    def modify_message(self):

        self.message="modified message"

        print(self.message)

        self.next(self.end)


    @step

    def end(self):

        print('The class members are shared between all steps.')

        print(self.message)


if __name__ == '__main__':

    SimpleFlow()
The designers of Metaflow decided to apply an object-oriented approach. To create a flow, we must create a custom class that inherits from FlowSpec class. Each step in our pipeline is marked by @step decorator and basically is represented by a member function. Use self.next member function to specify the flow direction in the graph. As we mentioned before, this is a directed acyclic graph – no cycles are allowed, and the flow must go in one way, with no backward movement. Steps named start and end are required to define the endpoints of the graph. This code results in a graph with three nodes and two-edged.

It’s worth to note that when you assign anything to self in your flow, the object gets automatically persisted in S3 as a Metaflow artifact.
To run our hello world example, just type in the terminal:
python3 hello_metaflow.py run
Execution of the command above results in the following output:
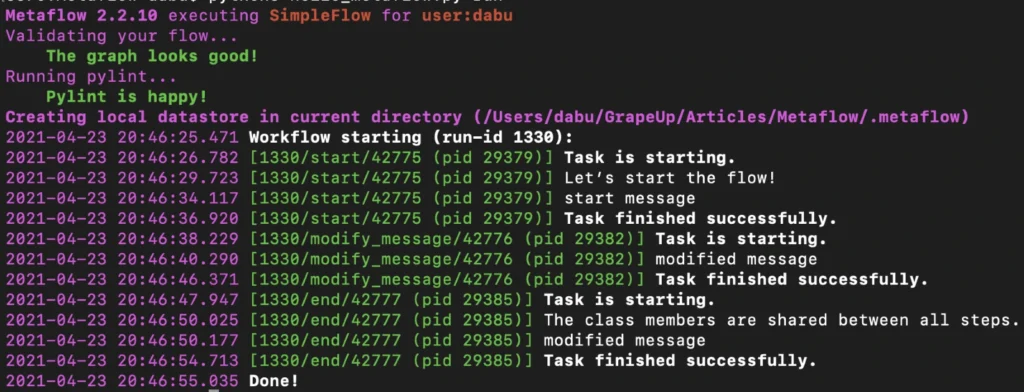
By default, Metaflow uses local mode. You may notice that in this mode, each step spawns a separate process with its own PID. Without much effort, we have obtained code that can be very easily paralleled on your personal computer.
To print the graph in the terminal, type the command below.
python3 hello_metaflow.py show
Let’s modify hello_metaflow.py script so that it imitates the training of the model.
hello_metaflow.py

from metaflow import FlowSpec, step, batch, catch, timeout, retry, namespace

from random import random


class SimpleFlow(FlowSpec):

    @step

    def start(self):

        print('Let’s start the parallel training!')

        self.parameters = [

            'first set of parameters',

            'second set of parameters',

            'third set of parameters'

        ]

        self.next(self.train, foreach="parameters")


    @catch(var="error")

    @timeout(seconds = 120)

    @batch(cpu = 3, memory = 500)

    @retry(times = 1)

    @step

    def train(self):

        print(f'trained with {self.input}')

        self.accuracy = random()

        self.set_name = self.input

        self.next(self.join)


    @step

    def join(self, inputs):

        top_accuracy = 0

        for input in inputs:

            print(f'{input.set_name} accuracy: {input.accuracy}')

            if input.accuracy > top_accuracy:

                top_accuracy = input.accuracy

                self.winner = input.set_name

                self.winner_accuracy = input.accuracy


        self.next(self.end)


    @step

    def end(self):

        print(f'The winner is: {self.winner}, acc: {self.winner_accuracy}')


if __name__ == '__main__':

    namespace('grapeup')

    SimpleFlow()
The start step prepares three sets of parameters for our dummy training. The optional argument for each passed to the next function call splits our graph into three parallel nodes. Foreach executes parallel copies of the train step.
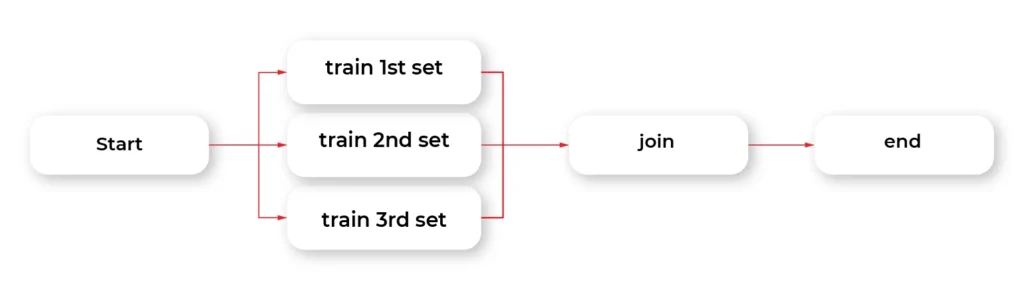
The train step is the essential part of this example. The @batch decorator sends out parallel computations to the AWS nodes in the cloud using the AWS Batch service. We can specify how many virtual CPU cores we need, or the amount of RAM required. This one line of Python code allows us to run heavy computations in parallel nodes in the cloud at a very large scale without much effort. Simple, isn’t it?
The @catch decorator catches the exception and stores it in an error variable, and lets the execution continue. Errors can be handled in the next step. You can also enable retries for a step simply by adding @retry decorator. By default, there is no timeout for steps, so it potentially can cause an infinite loop. Metaflow provides a @timeout decorator to break computations if the time limit is exceeded.
When all parallel pieces of training in the cloud are complete, we merge the results in the join function. The best solution is selected and printed as the winner in the last step.
Namespaces is a really useful feature that helps keeping isolated different runs environments, for instance, production and development environments.
Below is the simplified output of our hybrid training.

Obviously, there is an associated cost of sending computations to the cloud, but usually, it is not significant, and the benefits of such a solution are unquestionable.
Metaflow – Conclusions
In the second part of the article about Metaflow, we presented only a small part of the library’s capabilities. We encourage you to read the documentation and other studies. We will only mention here some interesting and useful functionalities like passing parameters, conda virtual environments for a given step, client API, S3 data management, inspecting flow results with client API, debugging, workers and runs management, scheduling, notebooks, and many more. We hope this article has sparked your interest in Metaflow and will encourage you to explore this area further.


More Stories
8 Tips for an Agile Debugging of a Web Application – Grape Up
Report: Apple planned to launch an iPhone-compatible Pencil this year
Hate speech on Twitter is at its lowest level, down even from pre-spike levels says Elon Musk- Technology News, Firstpost