


This article is the first one of the mini-series which will walk you through the process of creating an enterprise-level AWS infrastructure. By the end of this series, we will have created an infrastructure comprising a VPC with four subnets in two different availability zones with a client application, backend server, and a database deployed inside. Our architecture will be able to provide scalability and availability required by modern cloud systems. Along the way, we will explain the basic concepts and components of the Amazon Web Services platform. In this article, we will talk about the scaffolding of our architecture to be specific a Virtual Private Cloud (VPC), Subnets, Elastic IP Addresses, NAT gateways, and route tables. The whole series comprises of:
The cloud, as once explained in the Silicon Valley tv-series, is “this tiny little area which is becoming super important and in many ways is the future of computing.” This would be accurate, except for the fact that it is not so tiny and the future is now. So let’s delve into the universe of cloud computing and learn how to build highly available, secure and fault-tolerant cloud systems, how to utilize the AWS platform for that, what are its key components and how to deploy your applications on AWS.
Cloud computing
Over the last years, the IT industry underwent a major transformation in which most of the global enterprises moved away from their traditional IT infrastructures towards the cloud. The main reason behind that is the flexibility and scalability which comes with cloud computing, understood as provisioning of computing services such as servers, storage, databases, networking, analytic services, etc. over the Internet (the cloud). In this model organizations only pay for the cloud resources they are actually using and do not need to manage the physical infrastructure behind it. There are many cloud platform providers on the market with the major players being Amazon Web Services (AWS), Microsoft Azure and Google Cloud. This article focuses on services available on AWS, but bear in mind that most of the concepts explained here will have their equivalents on the other platforms.
Infrastructure overview
Let’s start with what we will build throughout this series. The goal is to create a real-life, enterprise-level AWS infrastructure that will be able to host a user management system consisting of a React.js web application, Java Spring Boot server and a relational database.
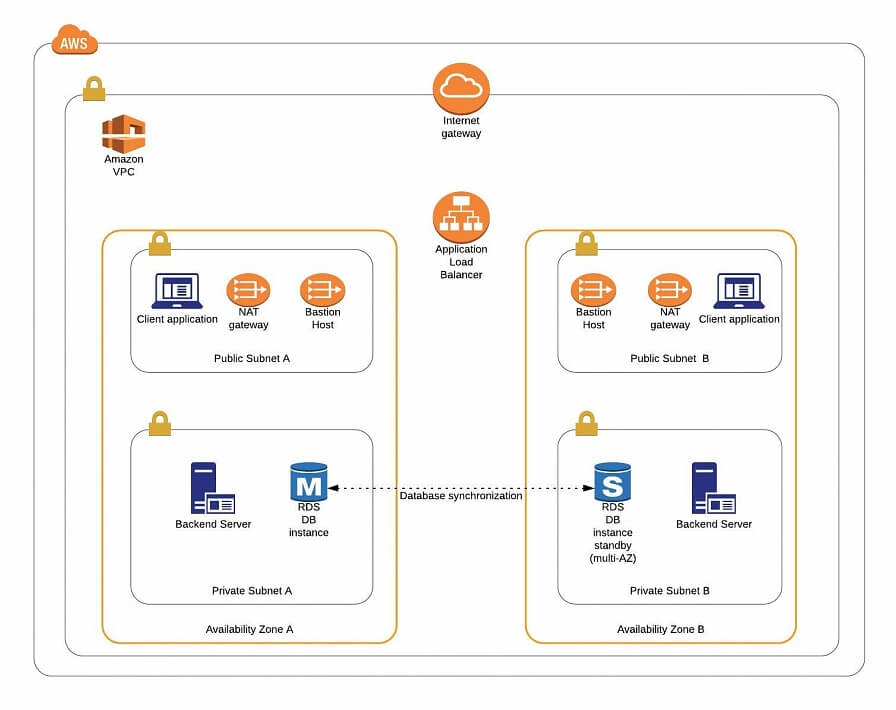
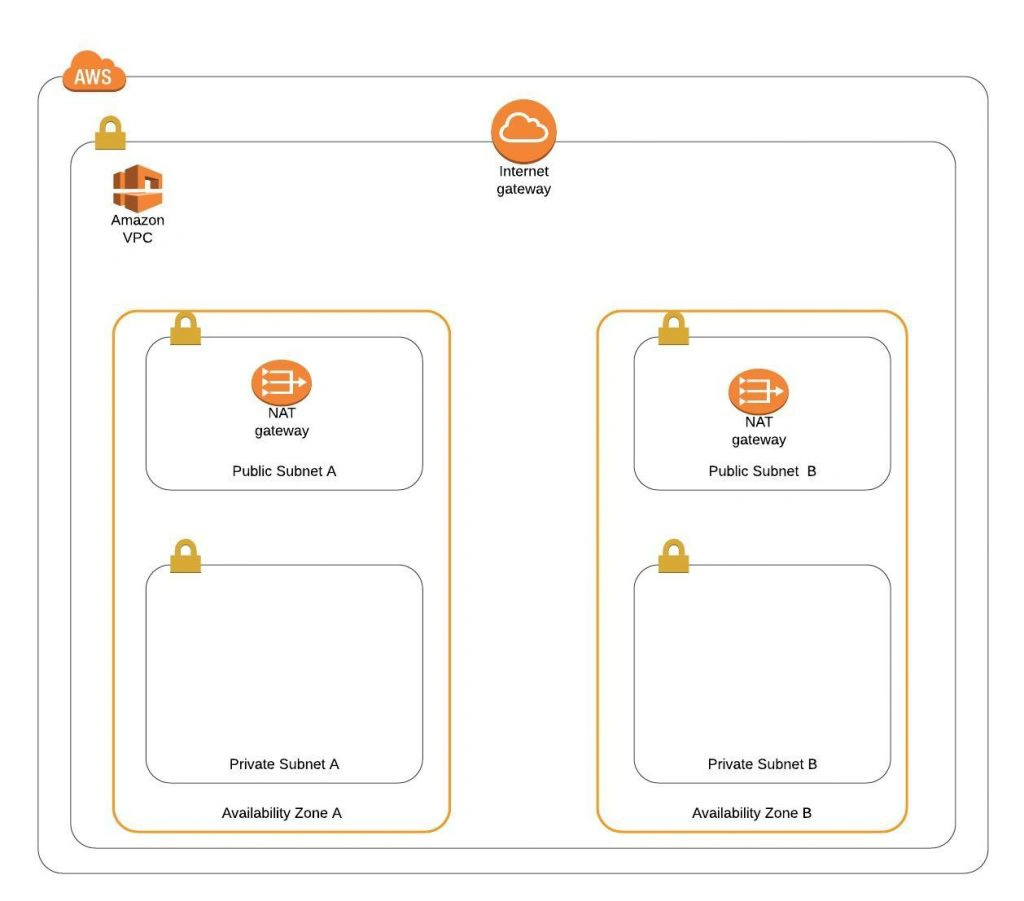
The architecture diagram is shown in figure 1. It comprises a VPC with four subnets (2 public and 2 private) distributed across two different availability zones. In public subnets are hosted a client application, a NAT gateway and a Bastion Host (more on that later), while our private subnets contain backend server and database instances. The infrastructure also includes Internet Gateway to enable access to the Internet from our VPC and a Load Balancer. The reasoning behind placing the backend server and database in private subnets is to protect those instances from being directly exposed to the Internet as they may contain sensitive data. Instead, they will only have private IP addresses and be behind a NAT gateway and a public-facing Elastic Load Balancer. Presented infrastructure provides a high level of scalability and availability through the introduction of redundancy with instances deployed in two different availability zones and the use of auto-scaling groups which provide automatic scaling and health management of the system.
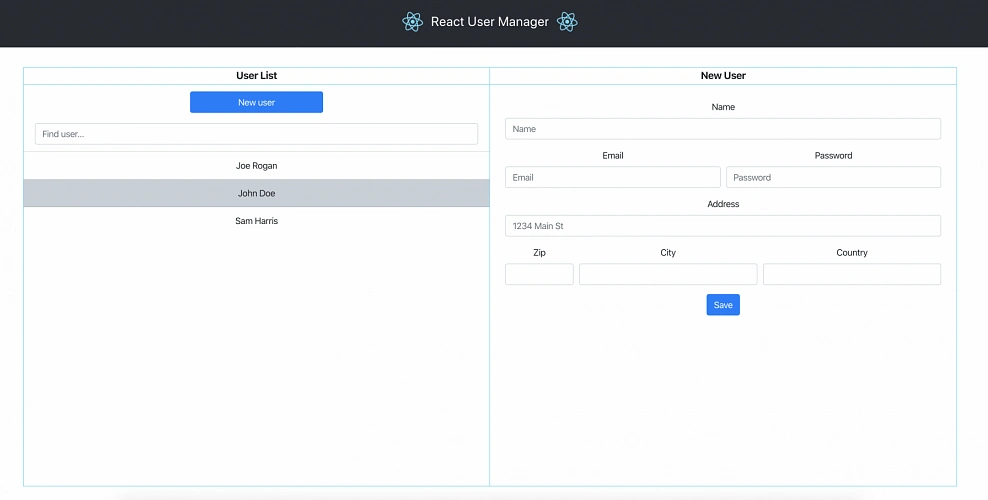
Figure 2 presents the view of the user management web application system we will host on AWS:
The applications can be found on GitHub.
In this part of the article series, we will focus on the scaffolding of the infrastructure, namely allocating elastic IP addresses, setting up the VPC, creating the subnets, configuring NAT gateways and route tables.
AWS Free Tier Note
AWS provides its new users with a 12-month free tier, which gives customers the ability to use their services up to specified limits free of charge. Those limits include 750 hours per month of t2.micro size EC2 instances, 5GB of Amazon S3 storage, 750 hours of Amazon RDS per month, and much more. In the AWS Management Console, Amazon usually provides indicators in which resource choices are part of the free tier, and throughout this series, we will stick to those. If you want to be sure you will not exceed the free tier limits, remember to stop your EC2 and RDS instances whenever you finish working on AWS. You can also set up a billing alert that will notify you if you exceed the specified limit.
AWS Theory
1. VPC
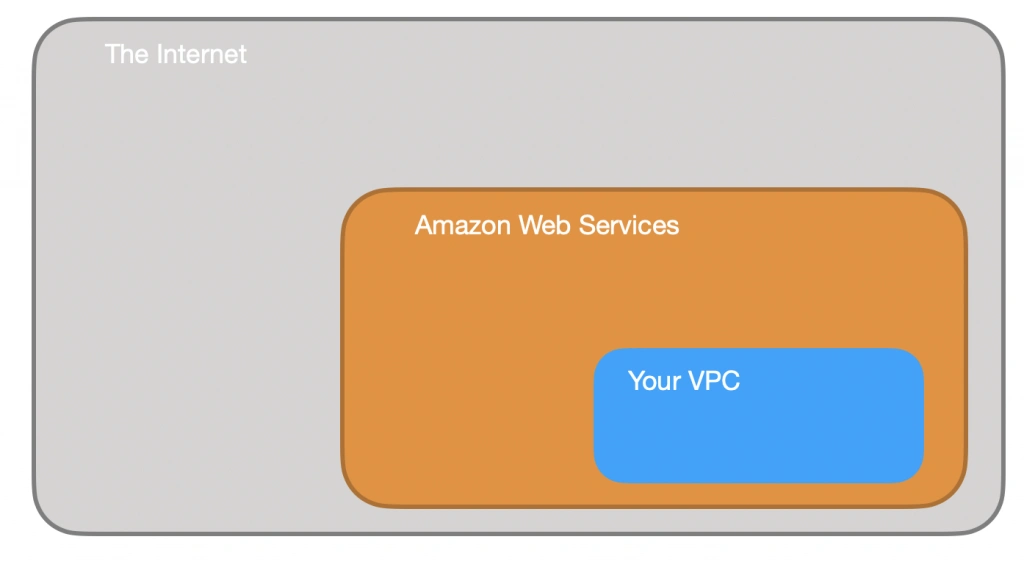
The first step of our journey into the wide world of the AWS infrastructure is getting to know Amazon Virtual Private Cloud (VPC). VPC allows developers to create a virtual network in which they can launch resources and have them logically isolated from other VPCs and the outside world. Within the VPC your resources have private IP addresses with which they can communicate with one another. You can control the access to all those resources inside the VPC and route outgoing traffic as you like.
Access to the VPC is configured with the use of several key structures:
Security groups – They basically work like mini firewalls defining allowed incoming and outgoing IP addresses and ports. They can be attached at the instance level, be shared among many instances and provide the possibility to allow access from other security groups instead of IPs.
Routing tables – Routing tables are responsible for determining where the network traffic from a subnet or gateway should be directed. There is a main route table associated with your VPC, and you can define custom routing tables for your subnets and gateways.
Network Access Control List (Network ACL) – It acts as an IP filtering table for incoming and outgoing traffic and can be used as an additional security layer on top of security groups. Network ACLs act similarly to the security groups, but instead of applying rules on the instance level, they apply them to the entire VPC or subnet.
2. Subnets
Instances cannot be launched directly into a VPC. They need to live inside subnets. A Subnet is an additional isolated area that has its own CIDR block, routing table, and Network Access Control List. Subnets allow you to create different behaviors in the same VPC. For instance, you can create a public subnet that can be accessed and have access to the public internet and a private subnet that is not accessible through the Internet and must go through a NAT (Network Address Translation) gateway in order to access the outside world.

3. NAT (Network Address Transfer) Gateway
NAT Gateways are used in order to enable instances located in private subnets to connect to the Internet or other AWS services, while still preventing direct connections from the Internet to those instances. NAT may be useful for example when you need to install or upgrade software or OS on EC2 instances running in private subnets. AWS provides a NAT gateway managed service which requires very little administrative effort. We will use it while setting up our infrastructure.
4. Elastic IP
AWS provides a concept of Elastic IP Address which is used to facilitate the management of dynamic cloud computing. Elastic IP Address is a public, static IP Address that is associated with your AWS account and can be easily allocated to one of your EC2 instances. The idea behind it is that the address is not strongly associated with your instance but instead elasticity of the address allows in a case of any failure in the system to swiftly remap the address to another healthy instance in your account.
5. AWS Region
AWS Regions are geographical areas in which AWS has data centers. Regions are divided into Availability Zones (AZ) which are independent data centers placed relatively close to each other. Availability Zones are used to provide redundancy and data replication. The choice of AWS region for your infrastructure should be determined to take into account factors such as:
- Proximity – you would usually want your application to be deployed close to your region of operation for latency or regulatory reasons.
- Cost – different regions come with different pricing.
- Feature selection – not all services are available in all regions, this is especially the case for newly introduced features.
- Several availability zones – all regions have at least 2 AZ, but some of them have more. Depending on your needs, this may be a key factor.
Practice
AWS Region
Let’s commence with a selection of the AWS region to operate in. In the top right corner of the AWS Management Console, you can choose a region. At this point, it does not really matter which region you choose (as discussed earlier, it may for your organization). However, it is important to note that you will always only view resources launched in the currently selected region.
Elastic IP
The next step is the allocation of an elastic IP address. For that purpose, go into the AWS Management console, and find the VPC service. In the left menu bar, under the Virtual Private Cloud section, you should see the Elastic IPs link. There you can allocate a new address owned by yourself or from the pool of Amazon’s available addresses.

Availability Zone A Configuration
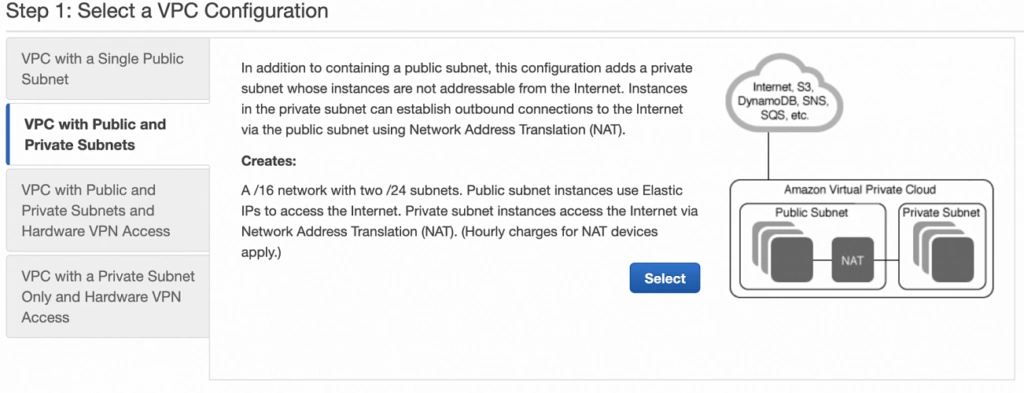
Next, let’s create our VPC and subnets. For now, we are going to set up only Availability Zone A and we will work on High Availability after the creation of the VPC. So go again into the VPC service dashboard and click the Launch VPC Wizard button. You will be taken to the screen where you can choose what kind of a VPC configuration you want Amazon to set you up with. In order to match our target architecture as closely as possible, we are going to choose VPC with Public and Private Subnets.
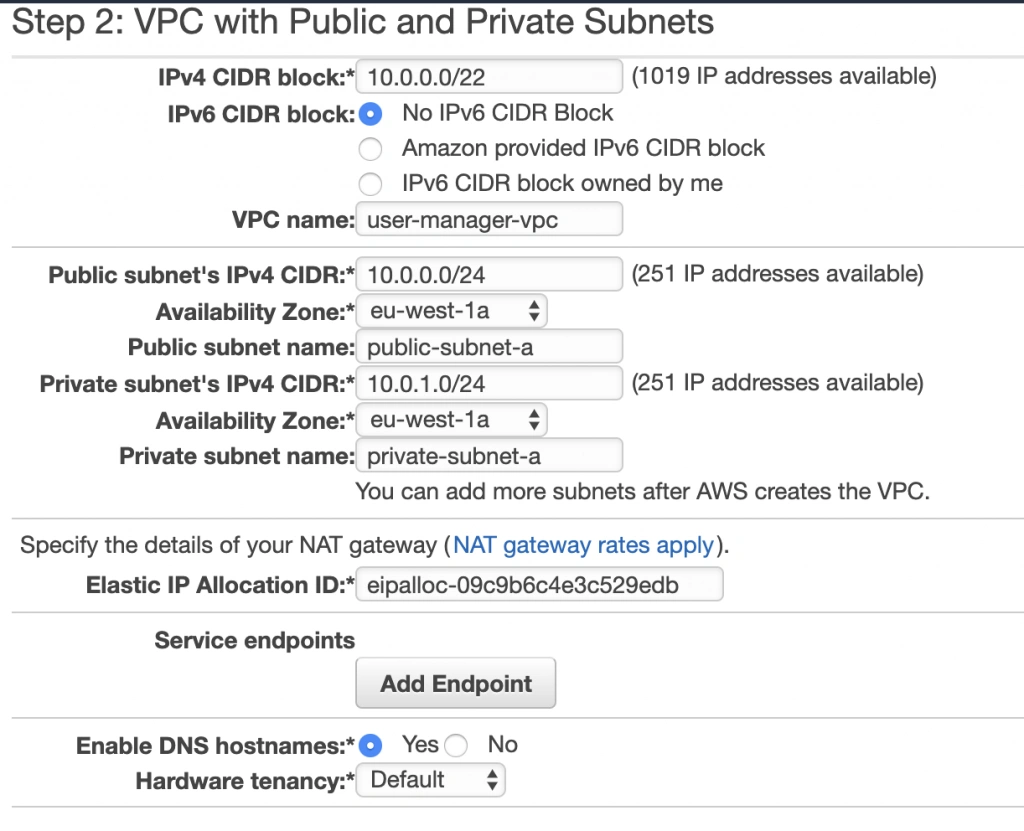
The next screen allows you to set up your VPC configuration details such as:
– name,
– CIDR block,
– details of the subnets:
– name,
– IP address range – a subset of the VPC CIDR range,
– availability zone,
As shown in the architecture diagram (fig. 1), we need 4 subnets in 2 different availability zones. So let’s set our VPC CIDR to 10.0.0.0/22, and have our subnets as follows:
– public-subnet-a: 10.0.0.0/24 (zone A)
– private-subnet-a: 10.0.1.0/24 (zone A)
– public-subnet-b: 10.0.2.0/24 (zone B)
– private-subnet-b: 10.0.3.0/24 (zone B)
Set everything up as shown in figure 7. The important aspects to note here are the choice of the same availability zone for public and private subnets, and the fact that Amazon will automatically set us up with a NAT gateway for which we just need to specify our previously allocated Elastic IP Address. Now, click the Create VPC button, and Amazon will configure your VPC.
NAT Gateway
When the creation of the VPC is over, go to the NAT Gateways section, and you should see the gateway created for you by AWS. To make it more recognizable, let us edit its Name tag to nat-a.

Route Tables
Amazon also configured Route Tables for your VPC. Go to the Route Tables section, and you should have there two route tables associated with your VPC. One of them is the main route table of your VPC, and the second one is currently associated with your public-subnet-a. We will modify that setting a bit.
First, select the main route table, go to the routes tab and click Edit routes. There are currently two entries. The first one means Any IP address referencing local VPC CIDR should resolve locally and we shouldn’t modify it. The second one is pointing to the NAT gateway, but we will change it to configure the Internet Gateway of our VPC in order to let outgoing traffic reach the outside world.

Next, go to the Subnet Associations tab and associate the main route table with public-subnet-a. You can also edit its Name tag to main-rt. Then, select the second route table associated with your VPC, edit its routes to route every outgoing Internet request to the nat-a gateway as shown in figure 10. Associate this route table with private-subnet-a and edit its Name tag to private-a-rt.

Availability Zone B Configuration
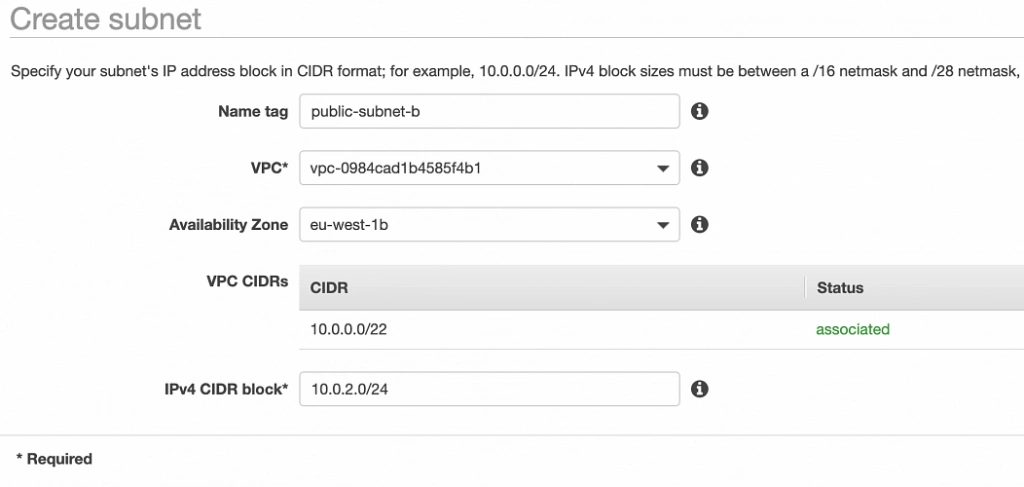
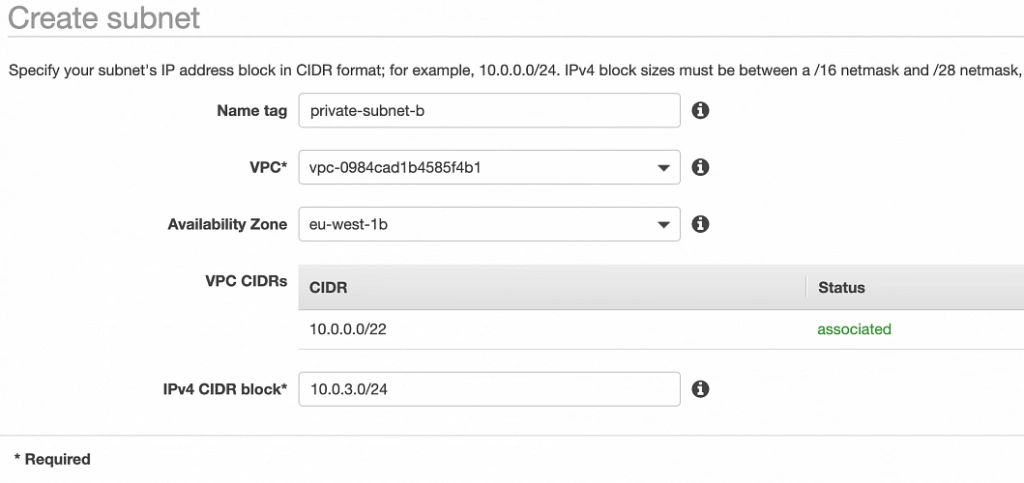
Well done, availability zone A is configured. In order to provide High Availability, we need to set everything up in the second availability zone as well. The first step is the creation of the subnets. Go again to a VPC dashboard in the AWS management console and in the left menu bar find the Subnets section. Now, click the Create subnet button and configure everything as shown in figures 11 and 12.
public-subnet-b
private-subnet-b
NAT Gateway
For availability zone B we need to create the NAT gateway manually. For that, find the NAT Gateways section in the left menu bar of the VPC dashboard, and click Create NAT Gateway. Select public-subnet-b, allocate EIP and add a Name tag with value nat-b.
Route tables
The last step is the configuration of the route tables for the subnets in availability zone B. For that, go to the Route Tables section again. Our public-subnet-b is going to have the same routing rules as the public-subnet-a, so let’s add a new association to our main-rt table for public-subnet-b. Then, click the Create route table button, name it private-b-rt, choose our VPC and click create. Next, select the newly created table go to the Routes tab and Edit routes by analogy with the private-a-rt table, but instead of directing every outside going request to nat-a gateway route it to nat-b (fig. 13).

In the end, you should have three route tables associated with your VPC as shown in figure 14.

Summary
That’s it, the scaffolding of our VPC is ready. The diagram shown in fig.15 presents a view of the created infrastructure. It is now ready for the creation of required EC2 instances, Bastion Hosts, configuration of an RDS database and deployment of our applications, which we will do in the next part of the series.


More Stories
8 Tips for an Agile Debugging of a Web Application – Grape Up
Report: Apple planned to launch an iPhone-compatible Pencil this year
Hate speech on Twitter is at its lowest level, down even from pre-spike levels says Elon Musk- Technology News, Firstpost